Letter Z Craft for Preschoolers
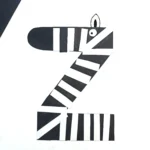
Turn the letter Z into a striped zebra with this fun letter craft for preschoolers. It blends letter learning with a creative animal alphabet craft.
- Prep Time: 5
- Total Time: 20
- Category: Alphabet, Crafts, DIY
- Method: Step-by-Step
Materials
● Black construction paper
● White construction paper
● Child-safe scissors
● Glue stick or school glue
● Black marker
Instructions
Start by cutting a large Z shape from black construction paper. The letter should be large enough to accommodate stripes and facial features.
2. Create the Zebra NoseCut a rounded half circle from black paper to form the zebra’s nose. Glue this shape to the end of the top horizontal line of the Z.
The rounded edge helps soften the sharp angles of the letter and forms the zebra’s snout.
3. Make the Zebra StripesCut several rectangles from white construction paper. These pieces will represent the zebra’s famous stripes.
Glue the white rectangles across different sections of the Z. Allow the rectangles to extend past the edges of the letter.
Once the glue dries slightly, trim away any extra paper that hangs over the edges of the Z. This step creates clean zebra stripes that match the letter shape.
4. Add the Zebra EyeCut a small circle from white paper. Draw a pupil in the center using a black marker.
Glue the eye near the top of the Z where the zebra’s head forms. Be sure to glue it onto a black stripe so it remains visible.
The small eye gives the zebra personality while reinforcing shape recognition for young learners.
5. Create the Zebra EarCut an ear shape from white construction paper.
Use a black marker to outline the ear and draw the inner ear detail.
Glue the ear above the zebra’s head to complete the animal’s face.
With the ear, nose, stripes, and eye in place, the letter Z craft now looks like a striped zebra standing proudly on the page.