How To Make A Letter T Craft for Preschoolers
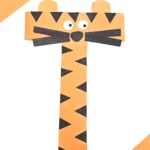
Turn the letter T into a tiger with this fun paper craft for kids. This hands-on uppercase T activity builds early literacy and fine motor skills.
- Prep Time: 5
- Total Time: 20
- Category: Alphabet, Crafts, DIY
- Method: Step-by-Step
Materials
● Orange construction paper
● Black construction paper
● White construction paper
● Child-safe scissors
● Glue stick or school glue
● Black marker
Instructions
Start by drawing a large uppercase T on orange construction paper. The letter should be thick enough so the stripes don’t overwhelm it. Cut out the orange T carefully. This forms the tiger’s head and body.
For younger children, a pre-drawn template can reduce frustration and allow focus on decorating. Older preschoolers may enjoy drawing and cutting their own letter shape.
2. Cut Out Black Triangles for StripesDraw and cut several small triangles from black construction paper. These triangles represent tiger stripes.
Glue the triangles across the top bar of the T and continue placing them down the vertical stem. Spacing them evenly strengthens visual pattern recognition, an important early math skill woven into this letter activity.
3. Create the Whiskers and NoseCut four long black rectangles to serve as whiskers. These should extend horizontally from the center of the T’s top bar, with room for the nose and a little space in between.
Next, cut a small rounded triangle or oval shape from black paper for the nose.
Glue the whiskers first, positioning them across the middle of the top section of the T. Then glue the nose in the empty space in the center of the whiskers.
4. Add the EyesCut two white circles from white construction paper. These will form the tiger’s eyes.
Using a black marker, draw small circular pupils onto each white circle. Expression can vary depending on placement.
Glue the eyes slightly above the whiskers on the top bar of the T.
5. Cut and Attach the EarsCut two rounded ear shapes from orange construction paper.
Glue the ears behind the top of the T so they peek out from the back. This layering technique introduces spatial awareness and design thinking within a simple paper craft for kids.
Allow the glue to dry completely before displaying.